Logz.io Log Management is where you can search and query your logs. It is optimized for debugging and troubleshooting issues as quickly and effectively as possible.
If you’re an admin for the main account, you can manage the main account and sub accounts from the Manage Accounts page ( > Settings > Manage accounts in the navigation menu).
The Log Management plan panel is located at the top of the Manage accounts page.
Manage your Log Management account
- View plan summary
- View and edit account details
- Configure which accounts can access a Logs data source
- Main vs. sub account
- Add and manage a Log Management sub account
- No correlation between logs and usage quota
- Delete a sub account from your plan
- Change how many GB are reserved to each account within your plan
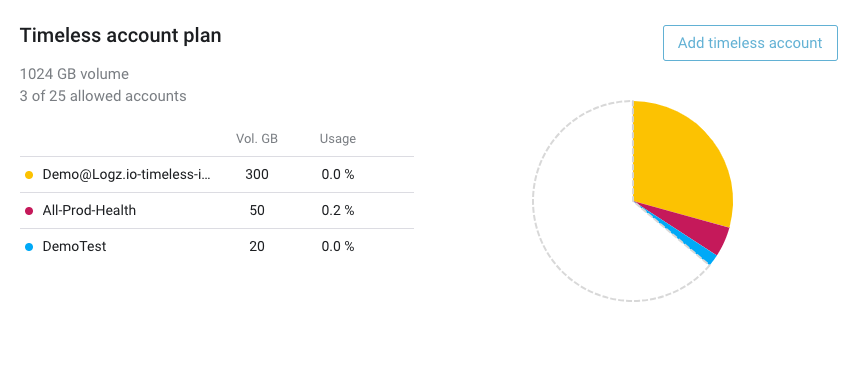
View Log Management plan summary
Your Log account is calculated based on the data you ingest. You can choose to use a flexible volume to get more control over how you allocate space and data between your accounts.
You can view the total number of daily GB available and the account’s retention. This summary also includes a detailed list of the available accounts, their reserved daily GB, and whether these accounts are capped, searchable, and if they include shared objects.

View and edit account details
To see the detailed information and the configurable options for each account, click the account name in the table or pie chart.

Inside each account, you can view and edit the following details:
- Account name (which you can change by editing it and clicking the Apply button)
- Account token
- Account retention duration
- Reserved volume (and whether to cap this account’s volume)
You can add the following elements:
- Save account utilization metrics (and how often)
- Save the account’s log size
- Which accounts/sub accounts have visibility to the data in this account

Configure which accounts can access a Logs data source
Each log account can become a data source for other Logz.io Log Management accounts. To manage access to your data, you create an access list of the Logz.io main account and sub accounts that can view the data.
To grant access to the data in a Logs account
Users that are logged in to the accounts you add here will be able to read the data in this account.
-
Click the account name to open its account details.
-
To enable access from other accounts, click Add an account and select the relevant accounts.

Main vs. sub account
If you’re on a Pro or Enterprise plan, you can create sub accounts to help manage user access to your data.
Sub accounts help you control data usage and manage user access to your logs.
You can define data volumes and retention periods for independent environments by shipping different logs to different sub accounts.
Sub accounts can also help you control access to sensitive data.
By default, all users of your main account have permission to view the data in other logging sub accounts and timeless accounts. You can route different logs to different sub accounts to limit access to data.
Add and manage a Log Management sub account
Sub accounts share the same setting options as the main account (See the list above). In addition, sub accounts have settings used to control access to the data.
To add a sub account, navigate to the Manage accounts page, and click the Add sub account button located in the upper left corner of the Log Management account plan panel.

Choose the sub account name, retention, and volume options if relevant. On the right hand side, you’ll have additional options for this sub account, including:
| Settings | Description |
|---|---|
| Enable main account users to access this account | If enabled, all main account users will automatically have user-role permissions to the sub account. This means they can view the log data in the sub account. If disabled, users will need to be explicitly added to the sub account to have access to it. |
| Searchable from the main account | If enabled, data stored in the sub account, can be searched directly from the main account in OpenSearch Dashboards. |
| Save account utilization metrics | Logs metrics on your account utilization, such as used and expected data volume at current indexing rate (GB). |
| Save log size | Adds the logSizeEnabled field to each log, stating the log’s size. |
| Use dashboards, visualizations, and saved searches from these accounts | Choose the main account from which these elements will be visible on the sub account. Useful if you want to be able to access your main account’s data from this sub account. |
Click Apply to create the sub account.
If you already have a sub account and you’d like to re-configure it, choose the relevant sub account from the list and click on Advanced options to access these settings.

No correlation between your logs and usage quota
You or your team see a small number of logs ingested with a high usage quota.
This happens when you apply the Today time frame to view logs and is the result of shipping logs with a date different from today’s date (Also known as sending Back/Future logs).
If you encounter this issue, you can adjust the time frame settings or contact Logz.io’s Support team for additional info and assistance.
Delete a sub account from your plan
Choose the Log Management sub account you want to delete, and click the Delete icon located next to its name.
Then, confirm (or Cancel) the action.
Change how many GB are reserved for each account within your plan
You can edit the amount of GB reserved for each of your Log Management accounts.
Choose the relevant account you’d like to edit, increase or decrease the reserved volume assigned to it, and click Apply to save your changes.
While your main account and sub accounts are better suited for short-term monitoring of your log data, they’re not really a cost-effective way to view long-term patterns and trends. That’s where timeless accounts come in.
Timeless accounts work with optimizers, allowing you to save a subset of your logs for as long as you need them. You can store key metrics that you want to track in your timeless accounts. Each timeless account contains its own Elasticsearch index, which you can search from your main account.
If you’re an admin for the main account, you can manage the main account and sub accounts from the Manage Accounts page ( > Settings > Manage accounts in the navigation menu).
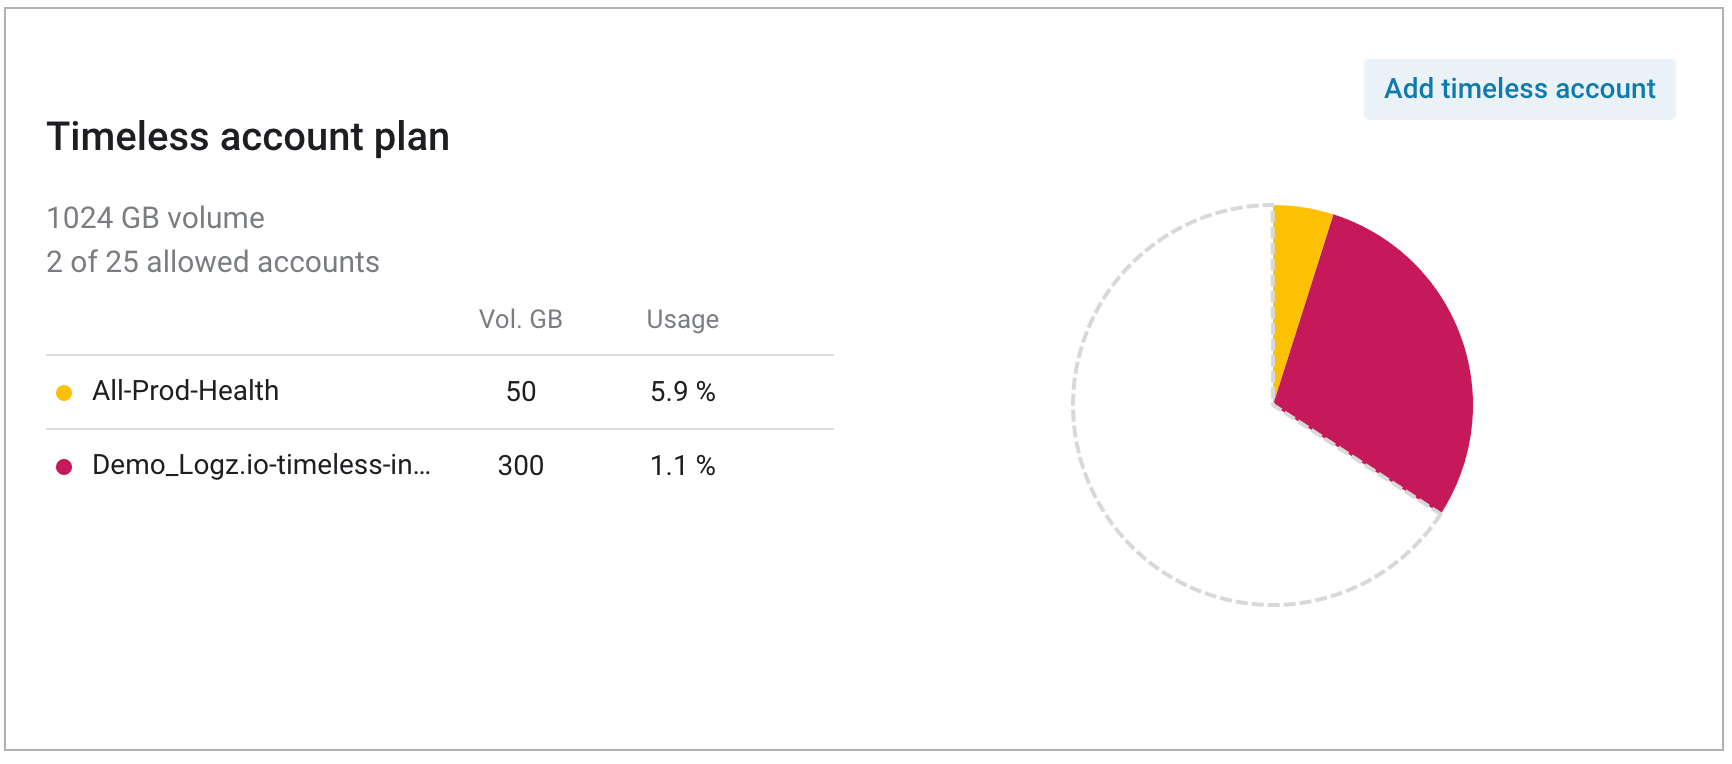
To create or manage a timeless account
Select or add a timeless account
In the Timeless account plan panel, click the timeless account you want to manage, or click Add timeless account.

Adjust account volume
If you need to adjust the Timeless account volume, type in the text box or use and .
Your plan allows for a maximum data volume.
Keep this limit in mind when you allocate resources to your timeless accounts—you won’t be able to exceed the limits of your plan.
Contact your Logz.io account manager if you need to increase your plan limits.
Set search permissions
If you want your sub accounts to be able to search this account, add the intended accounts to the Read & write permissions box.
Save your changes
Click Apply to save your changes.
To clean a timeless account
Find your timeless account plan
Log into your Logz.io account, navigate to Manage accounts, and find your timeless account plan.
Choose the relevant account
Click on the account you’d like to clean. Then, in the dropdown menu, you’ll be able to review the account’s data usage.
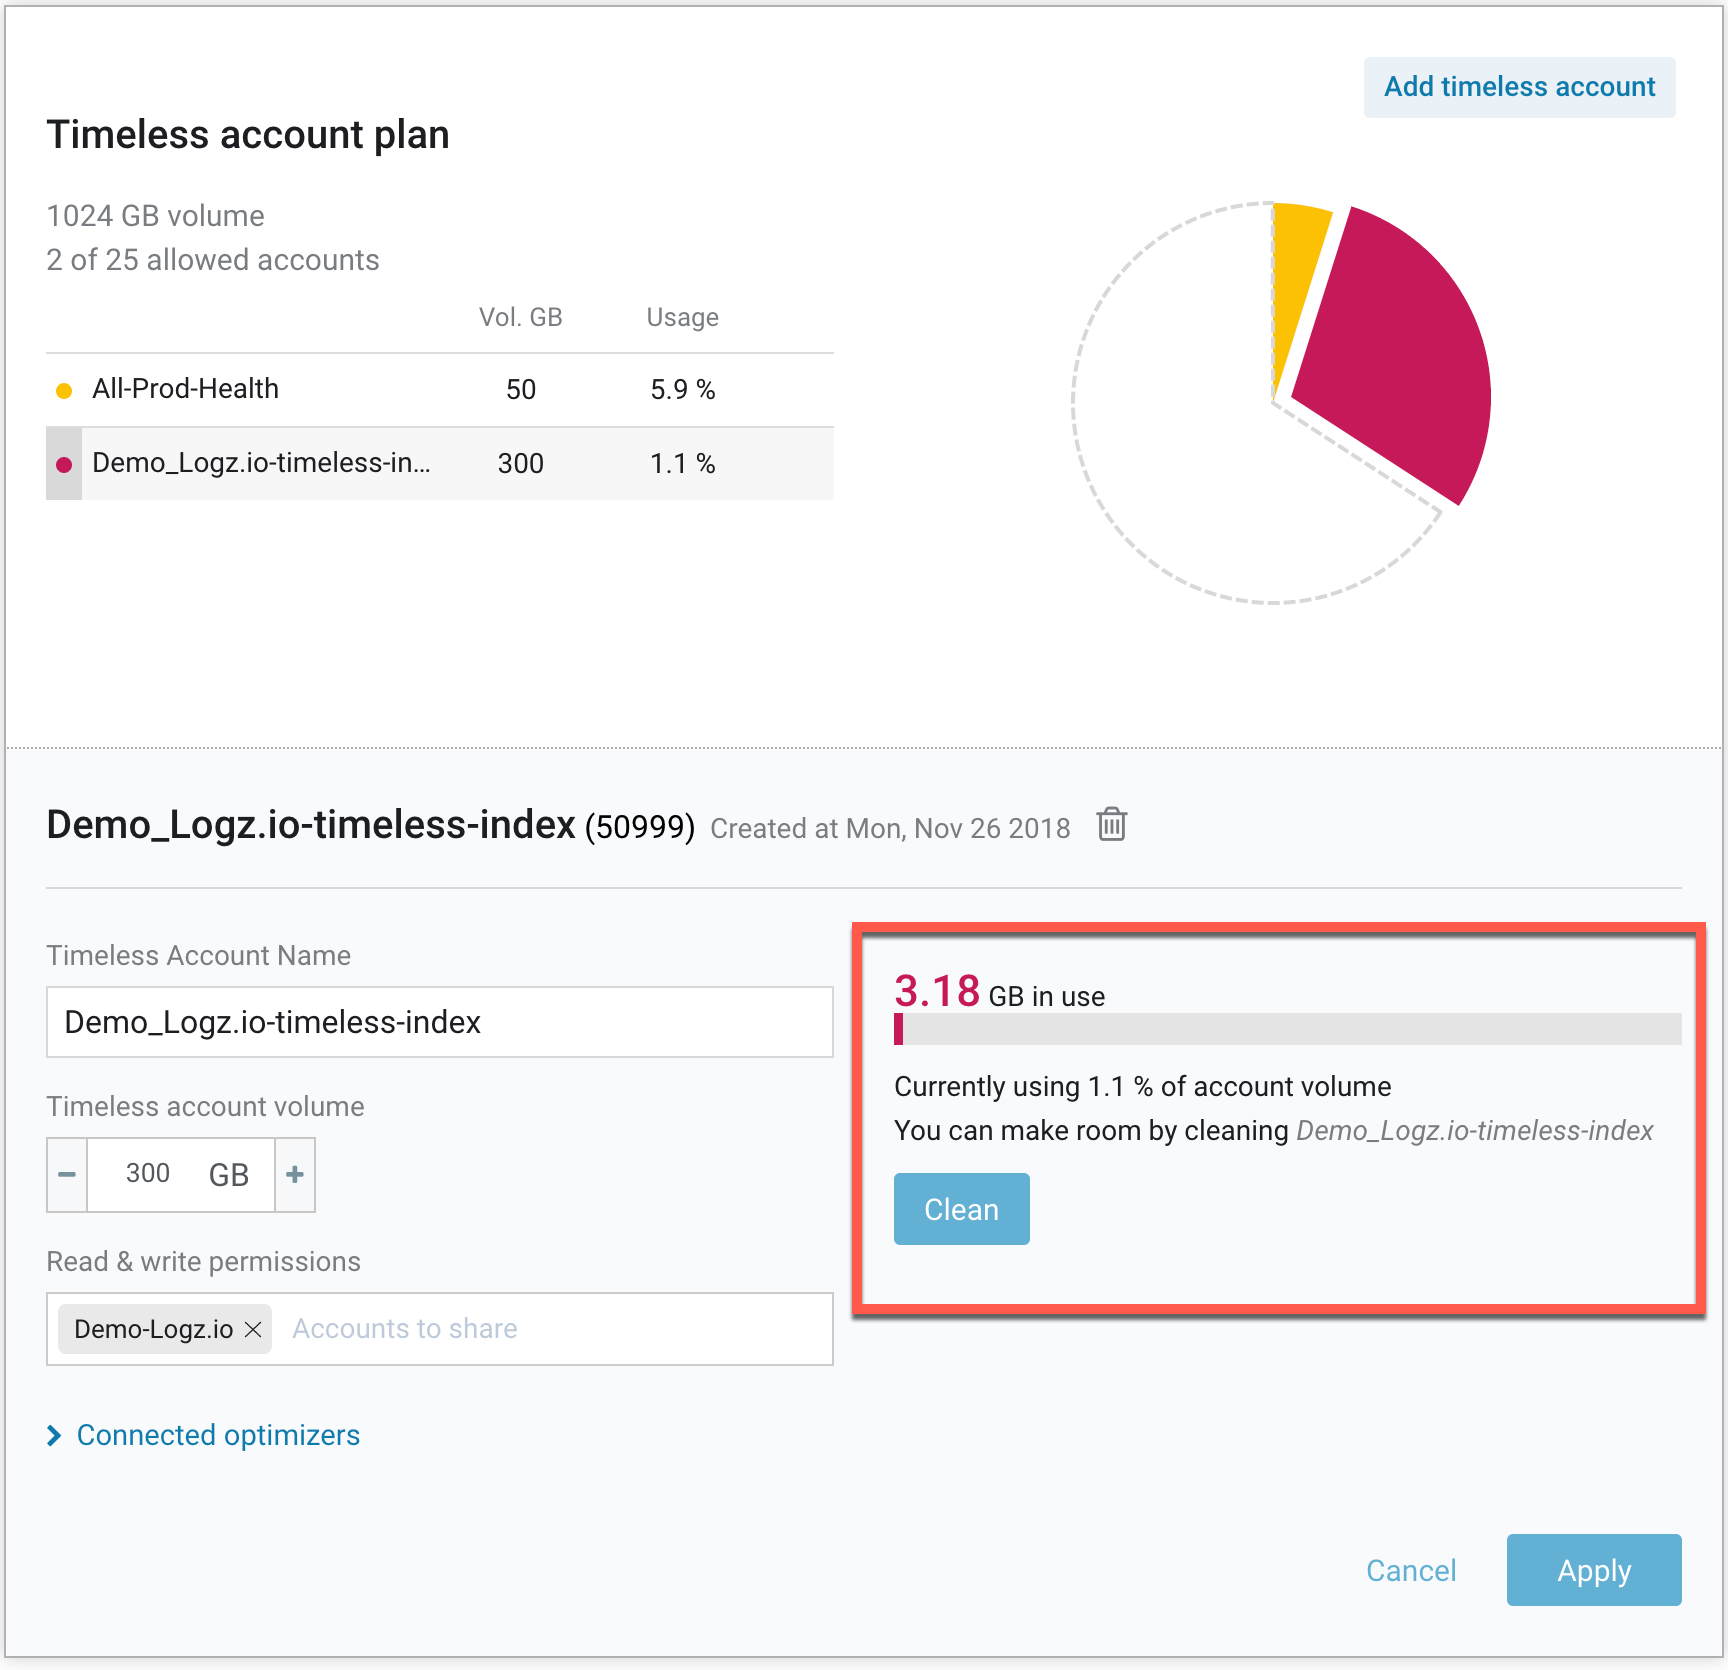
Clean the data
Click on the Clean button to open a popup with additional options. You can decide what log data to delete from your timeless account in this popup. Select the date range in which you’d like to clean the data. You can also select specific optimizers to clean. Next, click on Continue.

Confirm the clean
The final confirmation window summarizes how many log messages will be deleted in this process. This process might take a few minutes, depending on the number of log messages, and is irreversible. To confirm, click on the Yes, please clean my account button.

If you’re an admin for the main account, you can manage the main account and sub accounts from the Manage Accounts page ( > Settings > Manage accounts in the navigation menu).
The Distributed Tracing Account plan panel is located in the middle of the Manage accounts page.
You can view your Distributed Tracing account plan and the specific details and options that can be updated for each account within the plan.
If you don’t have a Distributed Tracing account yet, start a trial in the Distributed Tracing tab.
Manage your Tracing account
- View plan summary
- View details of specific accounts
- Update account name
- Configure account access
- Add a Tracing account
- Delete a Tracing account
- Edit and allocate spans
- Tracing surge protection
- Troubleshooting
View the plan summary and account allocations
Your Tracing account is based on spans: a building block of a trace, a named, timed operation representing a piece of the workflow in distributed systems.
You can view your monthly available spans, your plan’s data retention time, and a breakdown of each account’s current month’s allocations and usage percentages.

View details and options for a specific account
To see the detailed information and the configurable options for each account, click the account name in the table or pie chart.

You can view the following details:
- Account name and creation date
- Account token
- Summary and breakdown of the spans sent to the account over the last 7 days
And change the following account options:
- Tracing account name
- Which Logz.io main account and sub accounts can access the data in any of the multiple tracing accounts (which are data sources)
- Total spans allocated from the Distributed Tracing plan to this specific data source, which defines how many spans per calendar month can be ingested into this data source
- Remaining portion of the overall Distributed Tracing plan that can still be allocated to additional tracing data sources (accounts)
Update the account name
Enter a new Tracing account name and Save to update your changes, or Cancel to discard them.

Configure which accounts can access a tracing data source
Each Distributed Tracing account can function as a data source for other Logz.io accounts. To manage access to your tracing data, you create an access list of the Logz.io main account and sub accounts that can view the span data for each tracing account. You can see the list of all the sub accounts (and main account) in the top right of the application page, in the account selector.
When users are logged in to an account in the access list,
they can choose the tracing account as a data source in the Jaeger interface of the Tracing tab.

To grant access to the data in a tracing account
-
Click the account name to open its account details.

-
To enable access to a Distributed Tracing data source for other accounts, in the field below the Tracing account name, click Add an account, and select the relevant accounts.

Add a tracing account to your plan
You can configure up to 5 tracing accounts for your Distributed Tracing plan. If you need the ability to add more tracing accounts, reach out to your account manager or the Sales team.
To create a new account
- Click Add Tracing account in the upper left of the Distributed Tracing Account plan panel.
- Name the new account
- Set which accounts can use it as a data source in the Tracing tab.
-
Configure the Total monthly spans to allocate to the new account. If you don’t have spans available to allocate to the new plan, you’ll be prompted to reduce the allocation of another account.

- Click Save to apply your changes.

Delete a tracing account from your plan
-
In the account details, click the Delete icon next to the account name.

-
Confirm (or Cancel) the action.

Change spans allocation across Distributed Tracing accounts within your plan
Juggle the allocated spans per month of your Distributed Tracing account plan between the different tracing accounts according to each account’s current usage details. Each data source has its quota defined in the Spans column.

To change how many spans are allocated to a tracing account, pick the relevant account, increase or decrease the Total monthly spans and click Save to apply your changes.
By setting a daily limit, you can ensure incidents and issues won’t consume all of your monthly spans. The number represents a multiplier of your estimated daily span account, ranging between x2 and x30.

In the example below, New Tracing Account 2 is not using its allocated spans: It would be reasonable to reduce its monthly allocation and increase the allocation for the Tracing account.

Tracing surge protection
Your Distributed Tracing accounts are limited by a monthly quota of a number of spans, representing your Distributed Tracing plan.
To avoid a situation in which your monthly quota runs out too fast because of unnoticed spikes, Logz.io introduced a surge protection mechanism for Tracing accounts.
The surge protection is a span number-based quota, aimed to cover different scenarios in which your accounts run out of quota too fast.
The calculation is estimating your span number:
- Monthly spans quota / 30 = Estimated number of daily spans.
Your account’s overhead spans can be configured by changing the daily span multiplier. To configure the daily span multiplier, navigate to the Manage account page, select the relevant Tracing account, and apply the daily span multiplier.
If your Tracing account’s overall daily span number exceeds the estimated daily spans limit - the Tracing account will stop ingesting spans for this day (ending midnight UTC).
When an account exceeds 80% of the allowed daily spans, account admins will receive an email alert indicating an unusual traffic event in the Tracing account, providing extra time to examine the issue before the ingestion stops.
Troubleshooting
If your Tracing account exceeded its quota, the first thing you’ll need to do is check that the overall quota is assigned to your account.
Navigate to Manage accounts and scroll to find your Distributed Tracing plan. You’ll see how many spans you currently have and their distribution across your account.

In this example, the overall quota is 600M monthly spans, when only 450M are allocated to the Sock Shop Tracing account.
You can add more spans from the overall quota to prevent your Tracing account from getting suspended, increasing both your monthly and daily limit for this account.
If you have several Tracing accounts but don’t have any available spans from your monthly quota, you can allocate spans between the different accounts.

In this example, all of the monthly spans quota is divided between 2 Tracing accounts.
By moving 50M monthly spans to the Sock Shop Tracing DEV account, you can prevent the dev account from getting suspended.

If there are no available spans to allocate, you can contact Logz.io Support team to temporarily increase the quota limit.
Each Security account is a separate entity, with its own users, rules, and feeds. Security accounts can only access each other’s dashboards, rules, private feeds, or data if you enable and configure how these objects can be shared.
If you’re an admin for the main account, you can manage the main account and sub accounts from the Manage Accounts page ( > Settings > Manage accounts in the navigation menu).
If you’re interested in adding a Cloud SIEM plan, reach out to your account manager or email the Sales team.
Manage your Cloud SIEM account
- Add a Cloud SIEM account
- Configure or update your Cloud SIEM account
- Delete a Cloud SIEM account
- Investigate security events
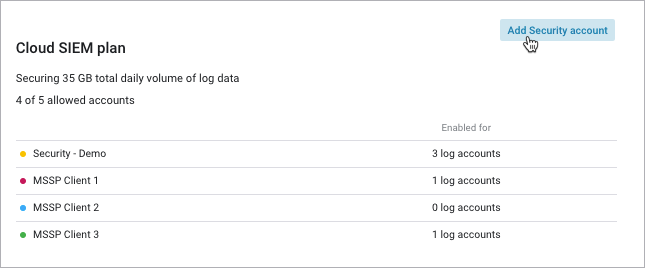
Add a Cloud SIEM account
You’ll find your Cloud SIEM accounts in the Manage accounts page of your Operations workspace. Scroll down to the bottom of the page to see them.
Click Add Security account to open the form. The number of accounts you can create is listed.
Configure or update a Cloud SIEM account
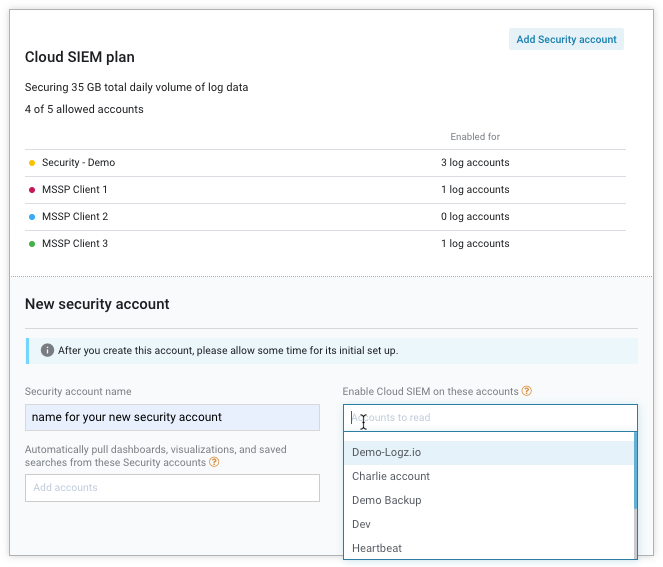
Fill in the form:
- Name (or rename) the account.
-
Enable Cloud SIEM on these accounts - Select the log accounts to be secured. You’ll be giving the security account read permissions so it can monitor and enrich the logs.
Logs are not shipped directly to your Cloud SIEM accounts. Instead, you’ll grant read-access to log accounts you want a security account to monitor.
You can add the same log account to multiple Security accounts. It will be monitored by each Security account independently.
- Automatically pull dashboards, visualizations, and saved searches from these Security accounts - Select which security accounts you can automatically pull shared objects from.
The security account you’re configuring will automatically be able to access the OpenSearch dashboards, visualizations, and saved searches from the source accounts you add to this list, but will not have access to the data in these accounts.
This is helpful if you have multiple main accounts.
For example:
- Instead of creating the same objects for each account, you can just share them!
- You can use this process to keep a local backup copy of these data objects.
- Create a library of data objects in your main Security account, and then enable client accounts to use objects from your main account.
Save your changes
Click Create/Apply to save your changes.
When you first add a new account, give it a few minutes to finish setting up.
Delete a Cloud SIEM account from your plan
-
In the account details, click the Delete icon next to the account name.

-
Confirm (or Cancel) the action.

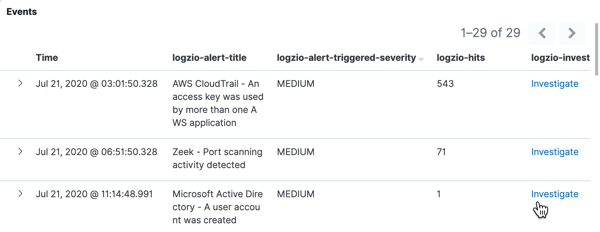
Investigate security events
Cloud SIEM logs a security event every time a rule triggers. The terms triggered rules and security events have the same meaning and are used interchangeably.
Logs of security events- logs of triggered rules- are kept for 10 years. This ensures that details concerning security incidents are kept on record and can be investigated and re-visited many months and even years after the fact as new findings come to light.
The event log includes details about the security incident and the rule that caused it to trigger. It also offers an Investigate link to pull up the logs that triggered the specific event quickly.
Logz.io Metrics lets your team curate dashboards to oversee continuous deployment, CI/CD pipelines, prevent outages, manage incidents, and remediate crashes in multi-microservice environments, hybrid infrastructures, and complex tech stacks.
If you’re an admin for the main account, you can manage the main account and sub accounts from the Manage Accounts page ( > Settings > Manage accounts in the navigation menu).
The Infrastructure Monitoring plan panel is located at the bottom of the Manage accounts page.
If you don’t have an Infrastructure Monitoring account yet, reach out to your account manager or email the Sales team.
Manage your Infrastructure Monitoring account
- View plan summary
- View details and abilities for a specific account
- Configure which accounts can access a Metrics data source
- Add a Metrics account to your plan
- Delete a Metrics account
- Change how many UMs are allocated to each Metrics account
View plan summary
Your Metrics account is calculated according to the unique metrics (UMs) you’re using. These metrics are a combination of the metric type queries by PromQL, including counters, gauges, histograms, and summaries.
You can view your daily and monthly available UMs, and a breakdown of each account’s current month’s allocations and usage percentages.

View details and abilities for a specific account
To see the detailed information and the configurable options for each account, click the account name in the table or pie chart.

Inside each account you can view the following details:
- Account name (which you can change by editing it and clicking the Apply button)
- Account creation date
- Account token
- Summary and breakdown of the unique metrics sent to the account over the last 7 days
You can edit the following elements:
- Which accounts/sub accounts have visibility to the data in this account
- Total unique metrics allocated to this specific data source, which defines how many daily unique metrics can be ingested into this data source

Configure which accounts can access a Metrics data source
Each Metrics account can become a data source for other Logz.io Metrics accounts. To manage access to your metrics data, you create an access list of the Logz.io main account and sub accounts that can view the data for each Metrics account. In the account selector, you can see the list of all the sub accounts (and main account) in the top right of the application page.
To grant access to the data in a Metrics account
If users are logged in to the accounts you add here, they’ll be able to read the metrics in this account.
-
Click the account name to open its account details.
-
To enable access to a Metrics data source for other accounts, click Add an account and select the relevant accounts in the field below the Metrics account name.

Add a Metrics account to your plan
You can add up to 5 Metrics accounts for your Infrastructure Monitoring plan. If you need the ability to add more accounts, reach out to your account manager or Logz.io’s Sales team.
To create a new account
- Click Add metrics account in the upper left of the Infrastructure Monitoring account plan panel.
- Name the new account.
- Set which accounts can use it as a data source.
- Configure the total monthly UMs you want to allocate to the new account. If you don’t have UMs available, you’ll be prompted to reduce the allocation of another account.
- Click Apply to apply your changes.
Delete a Metrics account from your plan
Choose the Metrics account you want to delete, and click the Delete icon located next to its name.
Then, confirm (or Cancel) the action.
Change how many UMs are allocated to each account within your plan
Set how many unique metrics (UMs) are allocated to each account from the overall Infrastructure Monitoring plan.
Choose the relevant account you’d like to edit, increase or decrease the Unique metrics assigned to it, and click Apply to save your changes.
