Security rules help you connect the dots between your data sources and events that could indicate a security threat or breach. Your Cloud SIEM account comes preconfigured with security rules for different attack types and security use cases.
You can create new security rules to supplement the built-in rules. You can also update any preconfigured rule at any time, including adding a notification endpoint (for example, email or Slack) or changing trigger thresholds.
- Name the rule
- Search components
- Set threshold and severity levels
- (Optional) Add MITRE ATT&CK Tags
- (Optional) Set notification details
- Save it!
To configure a rule
From SIEM > Rules in the navigation menu, click the yellow icon to open the Create a rule page.

Name the rule
Give your rule a meaningful name. When your rule triggers, its name is used as the email subject or notification heading.
Search components
Next, set the search components. This determines which logs to look for and in which accounts.
If you intend to create a correlated rule with 2 queries, see this guide.

Query and filters
You can use any combination of filters and a search query. Note the following:
- Use a Lucene search query.
- You have the option to use wildcards.
- The OpenSearch Dashboards Query Language (DQL) is not supported.
- All filters are accepted, including: is, is not, is one of, is not one of, exists, does not exist.
Once you’re done refining your search query and filters, you can click Preview in OpenSearch Dashboards to open OpenSearch Dashboards Discover in another tab. It can help to review the returned logs and make sure you get the expected results.
Group-by (order matters!)
You have the option to apply group by operators to up to 3 fields. If you use this option, the rule will return the aggregated results.
The order of group-by fields matters. Results are grouped in the order in which the group-by fields are added. (The fields are shown from first to last from Left-To-Right.)
For example, the following will group results by continent, then country, then city:

If we reverse the order (city, then country, then continent), it will likely generate unintended results.
Accounts to search
Next, select the Accounts to search. An account is the equivalent of an Elasticsearch index.
-
If you select All accounts, the rule will query the logs in all the accounts it has access to. It will automatically include any accounts added in the future.
-
You can select specific accounts. Select Just these accounts and add the relevant accounts from the dropdown list.
Set threshold and severity levels
Set your threshold and severity levels.
In the Trigger if... section, click Add a threshold to set as many as 5 threshold conditions, each with its own severity tag.

(Optional) Add MITRE ATT&CK Tags
MITRE ATT&CK is a curated knowledge base and model for cyber adversary behavior, reflecting the various phases of an adversary’s attack lifecycle and the platforms they are known to target.
You can add the predefined MITRE tags to your security rules and get an alert when a known cyber security threat is found in your systems.

Click on Add a Tag. Then, choose the Tactics (Why) and Technique (How) you’d like to monitor. For some Techniques, you’ll be able to select a Sub-technique to get more in-depth monitoring of it.
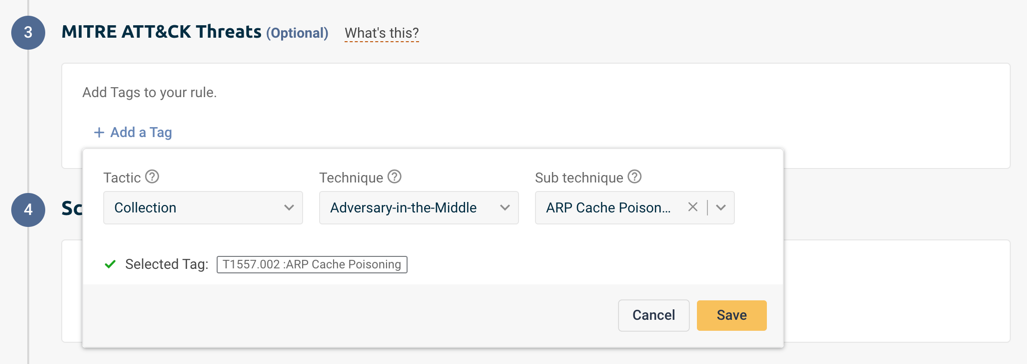
Click on your saved tags to view MITRE’s documentation and additional information for each one.
(Optional) Set notification details
Description and tags
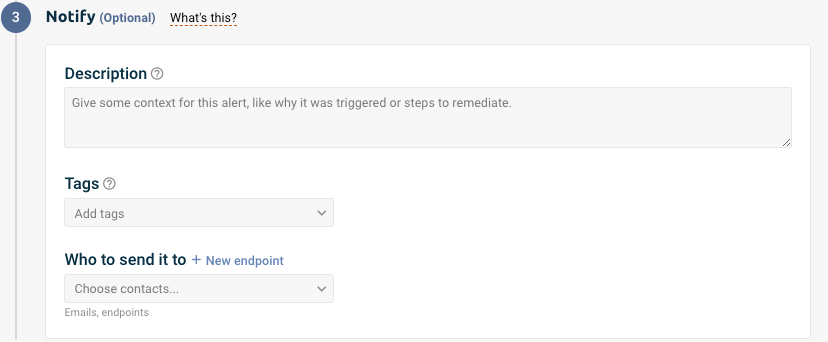
The Description will be included in any emails, Slack messages, and other notifications when the rule is triggered. We recommend making your description helpful to recipients, like telling them how to fix the issues that led to the rule.
The Tags are useful for filtering for events. You can add up to 25 tags per rule.
Who to send it to

If you want to send notifications or emails when the rule is triggered, choose notification endpoints. This isn’t required, though—triggered rules are still logged and searchable in OpenSearch Dashboards.
Choose the endpoints or email addresses to notify under Who to send it to. If you need help adding a new endpoint, see Notification endpoints.
To limit how often recipients are notified, choose the time period to wait between notifications.
When notifications are suppressed, Logz.io will continue to log triggered rules without sending notifications. You can search triggered rule logs at any time.
Output format
When triggered, the rule will send out a notification with sample data.
If the rule includes any aggregation or group by rule, the notification output defaults to the group by/aggregated fields.
Otherwise, you control the data format. It can be either JSON or a Table.
- If you select JSON, you can choose to send all fields or select fields.
- If you select a table, you can send as many as 7 fields.

To be selective about the output, click Add a field and select a field from the dropdown list. If you want, you can also add a sorting rule and a regex filter.
Using regex filters
You can “clean” the data in the notification using regex filters. If you add a regex filter, it will select for the data you want to include in the rule output.
There is no danger that a regex filter will disrupt the notification.
- If the regex matches the relevant data, you will see only the desired results.
- If the regex does not match, the filter will be disregarded and the rule output will include the full content of the field.
Save it!
Click Save to save your rule. Whenever the thresholds are met, the rule will trigger, and Logz.io will log the security event, and send out a notification, if configured.